The batteries of the 30MHz Connects have a span of 1 to 1.5 years, when the battery runs empty the sensor won't measure and send any data to the platform. Therefore it is important to recharge the battery before this occurs. When the battery is (almost) empty, you will be able to see this in the battery status in the platform. If you need a charger you can request this by contacting 30MHz Support.
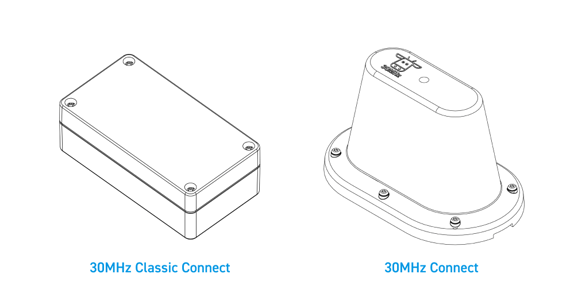
There are different versions of the 30MHz Connect; the Classic or the Connect. See the image below to find out which version of the 30MHz Connect you have.
This article will explain the different ways of charging:
Charging your 30MHz Connect
Charge your 30MHz Classic Connect by using a wireless charger
Charge your 30MHz Classic Connect by using the wired charger
Charging your 30MHz Connect
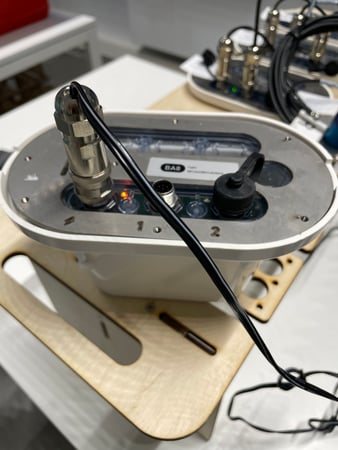
All of our 30MHz Connects and connected sensors use a wired charger. Here is how to charge the 30MHz Connect step by step:
- Unscrew the cap from the power port (the lightning bolt symbol)
- Attach the power supply plug to the 30MHz Connect
- Plug the power supply into the wall socket
- Check the charging status on the 30MHz Connect with the help of the led.
- Red: the 30MHz Connect is powered
- Orange: the 30MHz Connect is charging
- Green: the 30MHz Connect is done charging
- Wait for 4-6 hours.
- Green light? Unplug the power supply from the wall socket
- Disconnect the power supply plug from the 30MHz Connect
- Screw the cap on the power port
Note:
- Do NOT charge the sensor while irrigating. Always charge in a dry environment.
- Make sure the pins on the charger and sensor align properly
Charge your 30MHz Classic Connect by using a wireless charger
Most of our 30MHz Classic Connects can be wirelessly charged. If the 30MHz Classic Connect from the sensor only has an output where the sensor connects and no black charging port at the bottom, the sensor can be charged wirelessly. The 30MHz Classic Connect can be charged with any wireless Qi-certified charger (we recommend using the Choetech T511).
How to charge your sensor step by step:
For the Spigen F303W (looks like a black Z):
- Plug the wireless charger into a power socket. This will cause the lights of the charger to blink a few times to signify that it has power.
- Place the sensor on the charger as depicted below (the 30MHz sticker must show when the sensor is placed on top of the charger).
- The charger will show a solid blue light if it is charging.
- Charge the sensor for 4-6 hours.
- When the blue light has changed to both blue and red the sensor is fully charged.
- Charging is completed and the sensor is ready to be used again.

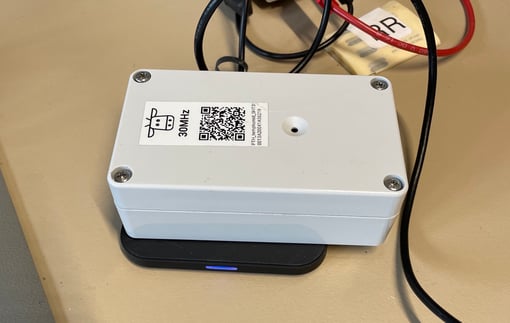
For the Choetech T511 (looks like a black plate):
- Plug the wireless charger into a power socket. This will cause the lights of the charger to blink a few times to signify that it has power.
- Place the sensor on the charger as described below.
- The charger will show a solid blue light if it is charging.
- Charge the sensor for 4-6 hours.
- When the sensor is done charging, the blue light will turn off.
- Charging is completed and the sensor is ready to be used again.
Note: Sometimes it may seem as if the charger is not working properly. This is often caused by incorrect placement of the 30MHz Connect.
Please make sure that the 30MHz Connect is placed as shown in the picture below; the 30MHz logo upwards, with the charger on the opposite side of the logo. This is where the battery is located. If the sensor does not charge right away, please make slight adjustments to its placement until the blue light shows.
Tip: Not sure if the charger is working? You can check this by charging your phone with it. In this case please make sure that your phone is suitable for wireless charging.
Charge your 30MHz Classic Connect by using the wired charger
Some 30MHz Classic Connects need to be charged with the 30MHz wired charger. These sensors can be recognised by the presence of a charge port (see picture below).
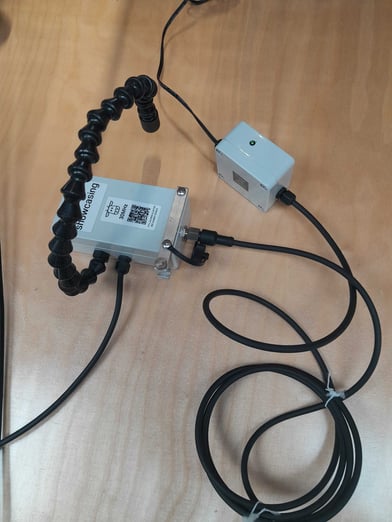
Charge your sensor with a wired charger, step by step:
- Plug the charger in a power socket.
- Take off the black cap from the charger port.
- Attach the charger to the charger port.
- Charge the 30MHz Connect for 4-6 hours.
- Put the black cap from the charger port back on.
- The 30MHz Connect is ready to be used again.