This article explains how to install the hardware from the Irrigation Management kit. In this article:
Content of the Irrigation Management kit
Install the 30MHz Gateway
Install the mounting bracket on the 30MHz Connect
Install the 30MHz Repeater
Install the sensor in soil
Install the sensor in Slab or Substrate
Start your Irrigation Management
Content of the Irrigation Management kit
1x 30MHz Gateway: to collect sensor data and send it to the cloud.
1x Repeater with power supply: to extend your sensor range and strengthen your network.
4x Moisture sensors and 30MHz Connect: to measure soil/substrate metrics.
1x Power supply: to charge the sensors via 30MHz Connect.
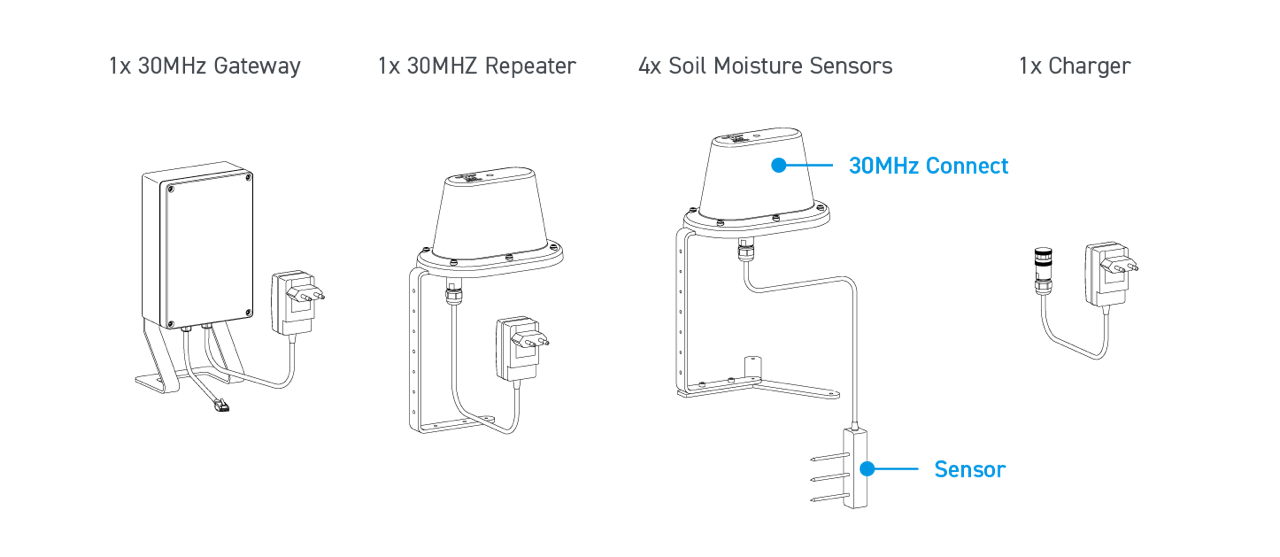
Warning: Do not detach the sensor cable from the 30MHz Connect.
Install the 30MHz Gateway
If you are already a 30MHz customer you can skip this point and go to Install the mounting bracket on the 30MHz Connect.
- Position the 30MHz Gateway as you see in the image above, in an office environment where internet connection and power are available.
- Plug the ethernet cable and the power supply in the matching sockets.
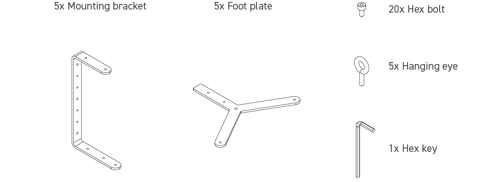
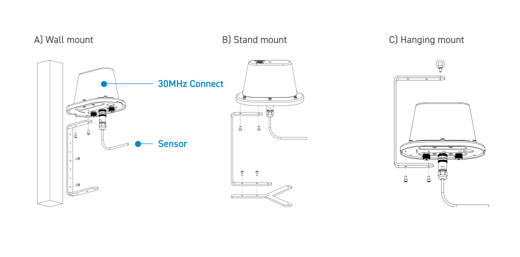
Install the mounting bracket on the 30MHz Connect
Content of the mounting bracket package
- Install the mounting bracket gives you 3 mounting possibilities: A) Wall, B) Stand, & C) Hanging mount.
- For the 30MHz Repeater (1x in package) option A) Wall and C) Hanging are preferable.
- For the 30MHz Connect (4x in package) option B) Stand mount is preferable.
- Important! To prevent water damage, always use the official mounting bracket and position the 30MHz Connect with the logo to the top.
Install the 30MHz Repeater
Place your 30MHz Repeater in your greenhouse or polytunnel and plug in the power supply in the socket. Take following into account:
- As high as possible
- Between the gateway and your most far sensor
- Orient the box with the logo facing upward
See image below for a ideal network & sensor set up.
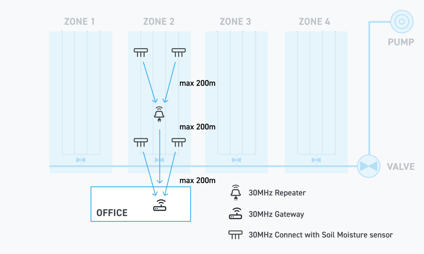
If you need more information on how to setup your network please read “How to setup your 30MHz wireless network”. These distance ranges are extremely dependent on environment influences, like position of the walls, different types of construction materials, altitude difference between the wireless devices and installation height with respect to the ground.
Install the sensor in soil
The sensor has to be installed in the effective root zone of your crop. Please take a look at the article ''What is the correct sensor depth for my crop?'' to find specific information for each crop.
- Dig a hole of the desired depth next to the plant that you want to monitor. For example, for tomatoes, dig a hole about 22cm deep.
- Install the sensor carefully by hand into the undisturbed soil of the hole sidewall with the needles oriented horizontally. The sensor may be positioned in any direction. However, with the body in a vertical position(as shown below), there is less restriction to water flow.
- Place the 30MHz Connect where it can stay during the whole crop cycle, with the logo on the casing facing upward.
- Please keep the loose cable out of the hole.
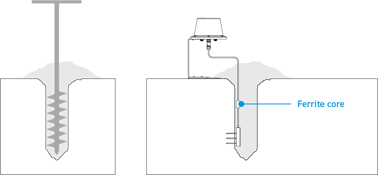
- Backfill the hole. Return soil to the hole, packing the soil back to its native bulk density to avoid air gaps near the sensor. Be careful not to pull the 30MHz Connect while filling the hole and do not hit the ferrite core as this could potentially pull the sensor out of soil.
Install the sensor in Slab or Substrate
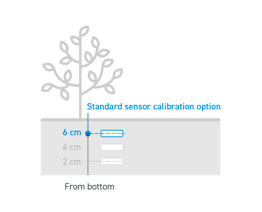
For Coco/Coir we pre selected a calibration according to a side 6cm from the bottom installation. Anyway, different insert sensor positions are available for substrate and you can choose the one that gives you the best measurement. If you need more information please read Which calibration profiles are available for Substrate Moisture sensors?.
Insert fully the sensor needles in the substrate side at 6cm from the bottom. When installing the sensors in an undisturbed part of the substrate avoid air gaps around the sensor needles.
Start your Irrigation Management
- Log in on the 30MHz platform and go to Sensors via the main menu. Are your sensors online? You are ready for the next step. Sensors offline? Take the following steps for troubleshooting.
- Go to the Irrigation Management Application. We have already sent you the link in the “Invite email”. You can reach the Irrigation Management Application via the main menu under Apps.
- Now you are ready to move your irrigation strategy to the next level. Please read How to use the Irrigation Management App to create your notifications and use of the Registration sheet app.
Optional for substrate: we preselected the right calibration for you based on the information provided in the order form. If you want to install the sensor in a different position or use a different calibration you can:
- Install the sensor in a different position than the prescribed one. But please make sure that the corresponding calibration is available in the list and change your calibration profile accordingly.
- We can calibrate the sensor for your substrate if the calibration is not available. Please get in touch with us to be informed about the calibration options and pricing.
If you need help, click on the Support button and get in touch with us!